オンラインスイーツスクールSaki.+中嶋咲絵です。
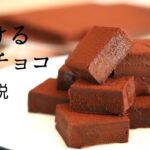
今回は口どけなめらかな生チョコをご紹介します。
ガナッシュの基本となる「乳化」の様子をじっくりやっています。
生チョコに限らずこの乳化は、なめらかな舌触りや口どけに関わる大事な部分ですのでぜひ覚えていただければと思います。
最後に洋酒を加えていますが、お酒を使わない方はその分生クリームを増やすようにしてください。
音声解説なしバージョンはこちらからご覧ください↓
****************************************************
オンラインでお菓子教室をやっています!
公式HP http://saki-plus.com/
メルマガ http://saki-plus.com/maillesson/
Instagram https://www.instagram.com/saki.plus/?hl=ja
FaceBook http://www.facebook.com/sakie.nakajima.ss
その他、アドバイザー・レシピ開発等も行っています。
****************************************************
Ingredients: 18 x 18 cm square mold (cut into 3 x 3 cm pieces), about 36 pieces
180g dark chocolate
90g milk chocolate
(The percentage of chocolate is just a guideline, so you can vary it slightly.
30g glucose
180g whipping cream (35%)
10g rum
If you don’t add liquor, increase the cream by 10g.
Preparation
・Line a mold with baking paper.
How to make
(1)Heat cream and glucose and bring to a boil while dissolving the glucose. Be careful not to spill.
(2)Melt the chocolate in a microwave or in a hot water bath. Melt the chocolate in the microwave or in hot water. It is OK if it is still a little chunky.
※If using a microwave, melt the chocolate a little at a time so as not to burn it.
(3)Add about 2 tablespoons of heavy cream at the beginning and gradually mix from the center.
When making ganache, press down the rubber spatula to mix with as little air as possible.
(4) Separate the mixture once in the emulsification stage. Add the cream again to the same extent and mix, and it will soften in the separated state.
(5) Add more cream, and this time the oil will float to the surface and become shiny. This is the second step.
(6) When more cream is added, the oil will no longer float and the oil and water will be firmly connected. This is “emulsification.
(7) Once the mixture is emulsified, it will not separate, so keep adding the rest of the cream and mixing.
If the mixture becomes too loose, air bubbles will easily form, so be careful!
(8)Finally, add the rum and use a blender to remove the air.
(9)Pour the mixture into a mold and chill in the refrigerator overnight.
(10)When the dough has cooled and hardened, remove the paper from the sides, place a new sheet of baking paper on top, turn the over, and remove the paper.
(11) Before cutting, determine the size and mark it.
(12)Warm the knife to remove moisture, then drop the knife from the top and cut.
※If the knife is too warm, it will melt.
※Warm the knife after each cut to remove dirt.
(13)Turn the cut in the same way.
(14)Finally, sprinkle cocoa through a tea strainer.
Place a palette over the tea strainer and shake to evenly distribute the cocoa.
【材料】18×18cm角型(3×3cmカット)約36個分
スイートチョコレート56% 180g
ミルクチョコレート33% 90g
※チョコレートの%は目安ですので多少前後してもOKです
水あめ 30g
生クリーム35% 180g
ラム酒 10g
※お酒を加えない場合は生クリームを10g増やす
【下準備】
・型にオーブンペーパーで作った型紙を敷いておく
【作り方】
①生クリーム35%と水あめを火にかけて水あめを溶かしながら沸騰させる。
※吹きこぼれに注意です
②チョコレートをレンジ、もしくは湯せんにあてて溶かす。少し固まりが残っているくらいでOK.
※レンジを使う場合は焦がさないように少しずつ溶かします
※湯せんで溶かす場合は熱伝導の良いステンレスボウルがオススメです
③生クリームを始めに大さじ2杯分程度加え、中心から少しずつ混ぜる。
ガナッシュを作る時は空気をなるべく入れないようにゴムベラを押し付けて混ぜていきます。
④乳化の段階で一度分離する。また同じ程度、生クリームを加えて混ぜると分離状態で柔らかくなってくる。
⑤さらにクリームを加えると、今度は油分が浮いてツヤが出てくる。ここが第二段階。
⑥さらにクリームを加えると、油分の浮きがなくなって油分と水分がしっかり繋がった状態になる。これが「乳化」です。
⑦乳化したら分離はしないので残りの生クリームをどんどん加えて混ぜていく。
※緩くなると気泡が入りやすいので注意です!
⑧最後にラム酒を加えまぜ、ブレンダーで空気を抜いていく。
※ブレンダーがない方は裏ごしだけでも違います
⑨型に流し、冷蔵庫で一晩冷やし固める。
⑩しっかり冷え固まったら、側面の紙を外して新しいオーブンペーパーを乗せて裏返し、紙を外す。
⑪カットの前にサイズを決めて印をつける。
⑫ナイフを温めて水気をとり、上からナイフを落として切る。
※ナイフを温めすぎると溶けてしまうので触って温かいくらいにしておきます
※ナイフは1カットごとに温めて汚れを取ります
⑬90度向きを変えて同じようにカットする。
⑭最後に茶こしでココアを振って完成。
※パレットなどを茶こしにあてて振ると均等にかかります
■中嶋咲絵プロフィール
製菓衛生師
菓子製造技能士1級
高校卒業後、パティスリーで11年修行。
独学で製菓衛生師を取得。
トップパティシエの登竜門、ジャパンケーキショーで4度入賞。
その他入賞経験多数。
その後、製菓学校教員へ転職。
お菓子を作る仕事から教える仕事という新たなチャレンジをする。
4年間、製菓実習はもちろん製菓理論など、座学授業も受け持つ。
「教える」仕事にやりがいを感じ、現場で培った技術と専門学校で磨いた教えるスキルを生かし
全国どこからでも受講できる、オンラインスイーツスクールの立ち上げを決意する。
2019年12月オンラインスイーツスクールSaki.+を開講。
#生チョコ
#バレンタイン
#お菓子作り
#パティシエ
コメントを残す